Welcome to Our Home

For years people have come to my home and always been very complimentary. I always thought of it as more of a cordiality. Recently I took part in our neighborhood Christmas homes tour. Over 250 people came into my home. When I saw ladies taking pictures of my ideas, I realized that I truly do inspire others. Sometimes I come up with ideas, and my husband really thinks I'm taking things a step too far. Like 5 months after we moved into our brand new home, I wanted to paint all the fireplace wood work and mantle black. Well, 4 years later we still like it and show guests the 'before' photo. We are all inspired by something. So, as I share things on this blog, I hope you duplicate, improve and are inspired to take your decorating just one step further. Enjoy!

Monday, May 2, 2011

Message in a Letter Tray

Soooo, if you haven't guessed by now, I love thrift stores. I love them more than garage sales. Because I don't have to drive, stop, drive, stop, haggle, drive, stop, etc. And typically the prices are fair. I visited one of my favorite thrift stores of the past and was disappointed that their prices went up so high. But, I did find this wooden letter tray that I really did like. It was in good shape and I loved the color.

I knew I wanted it to have a simple message and it is between our kitchen and dining table. So, EAT seems appropriate and to the point. I printed the letters, cut them out, and then traced around them. Tip: To conserve printer ink, change your font to outline only.

I then painted the letters in and applied my favorite antiquing gel on top. Simple, cute and cheap at 99 cents.

Sunday, April 3, 2011

Ballard Inspired Mosaic

I REALLY love this picture from Ballard Designs:

SOOOOOO, I was thrilled when I found another blogger who was inspired from the same print and made her own version. http://hopestudios.blogspot.com/2010/07/paint-chip-mosaic-tutorial-tuesday.html
As a matter-of-fact, my crafty friends and I are getting together and making one ourselves. However, my friend Lisa and I agreed we like the variation the original has a bit more and I was determined to get closer to the 'original' look. So, I began making a mini version to test some ideas out.
I followed the guidelines that Hope Studios gave. I laid out my paint chips then numbered them on the back so I knew which order to put them in. I used Elmer's spray glue to adhere them to my almost 12 x 12 scrap wood piece I found.
Hope Studios mentioned they had a problem with the edges of the paint chips curling up. I didn't. So, I don't know if it is the spray glue I used or the pine wood board. Once the glue chips were in place, I scratched up the chips using an X-Acto Knife and sand paper.
I applied my decoupage glue and let it dry. Once that was done, I painted on the Plaid Antiquing Gel that I have mentioned in the Metal Frame project on March 27th. I still didn't have the effect I wanted. So, after the gel was dry, I got out the sand paper again. OH YEAH! It was perfect. Once sanded and roughed up a bit, I then decoupaged again. I LOVE this soooo much, I am going to make another, 24" x 24".

Double Cloche

It's common in the craft/blog sphere to see a zillion different cloches people have made. I have created my own little design using globes from 2 light fixtures. I found this globes at the Salvation Army for $4 each and knew exactly what I wanted to do with them. I had candle holders I wanted to cut down for a base. I just needed wooden platters/plates to make a platform. I was surprised how much a round piece of wood is $10+. Sooooo, I was on a hunt. We went to a rummage sale and finally found them! Yeah! So, here is what I started with: 2 Domes, 2 wooden plates and 2 candle holders:

My husband cut down the candle holders to make them a more stable height. I sanded and painted my wooden plates. Only to discover they were from Pier 1 for $10 each. (Did I mentioned I paid a whole BUCK each for them??)
Anyway, I painted them green and then applied my favorite antiquing gel from Plaid.
I also painted the candle holders. I had a much harder time. The finish was difficult to sand, and quite frankly, I am just a little too impatient. Soooooo, I the end result is equal to the amount of effort I was willing to put into them:

I then screwed the plate to the candle holders and tah dah! I've got my cloches. NOW, I jut need to figure out what goes inside them. You seeeeeee, the beveled glass does make things distorted a bit. So my birds just look like white balls. So, that again, requires patience from me. But, I couldn't wait to share my little project with ya!

Sunday, March 27, 2011

Metal Frame Re-Do

First, I am so thrilled to finally post something again on my blog. I love doing this. I have oh so few followers, but I don't care! It's been over 5 1/2 months. Nina-Li is here and adjusted well to us as her new family and I can begin doing things again slowly that I love to do!

A few weeks ago my girlfriends Sheri & Sarah and I went to a High & Dry Home Goods sale. Sarah cashed in some B-Day money and I took in some ideas. One was I loved the way she used red on old metal pieces and antiqued. So easy, & oh so cute! So, when I was at Goodwill and found a scratched-up white metal frame, I had just the idea.

My plan was simply to do what I stated above, spray it with red and antique. Quick & Easy! In the middle of the short project I had idea #2. Unfortunately, like many project I forget to take a before picture, I get so anxious sometimes. So, this is the proof it was old ugly and white, the back part that I didn't finish.

So, after I spray painted this metal frame red, I added chalkboard paint! The metal part of the frame that is typicaly behind the picture got three coats.

Once everything was dry, I antiqued it using this antiquing medium from FolkArt. I have used this product for years and love it. But, it is becoming harder and harder to find. Even on the plaid paints website. I can only find it at Hobby Lobby & afraid it will be unavailable eventually. So, if you find it, stock-up! The color is apple butter brown. They have one or two other colors, and I do like them all. This is just my favorite. All you do is put a few drops on it and paint it on. Let is dry for a minute or so and wipe it down. It is easy to use too much. I advise only using a little bit, allowing it to dry for a short time; before using a lot and allowing 2 or 3 minutes of drying time. You can always add more but cannot take it off as easily. I also like to use this for decoupage projects.

What I love about this is that I can use this as a small magnet board, hold pictures in it, or use it as a mini-chalkboard. I LOVE IT!


I believe in inspiration. I believe taking one idea and turning into something a little different. I believe that the highest form of flattery is duplication. Sooooo MANY of my ideas come from something I have seen. However, this little, simple project I thought of all on my own. Well, other than the red inspiration. So, I hope you are inspired and I really hope that I will be back soon. I have a headboard and a small bench I want to combine into one large bench. Can't wait!

Monday, October 18, 2010

Asian + Americana = One Adorable Girly Room

Well, it has been 12 looonnngggg months and we are finally DONE with Nina-Li's room. With just a few days to spare, as we are going to China very soon. Here are before pictures. Not the best pictures, but this is when it was simply our homeschool classroom.


The photo on the left has a ledge. This room used to be a loft room. Once we knew we were going to need it as a bedroom we enclosed the room. However, continued to use it as a classroom until Bill was ready to transform the room. This ledge is now where her built-in bed is. Which you will see soon!
This photo shows the frame support for the built-in:

The boys helped Bill lay the hardwood. It's funny that it is the first thing to be done and the last. They laid the hardwood months ago, but staining it was the last thing we did. They did an awesome job.

We also added a type of trim to this wall. I don't know what you would call this, that tells you how much of a designer I am. But, I like it:

Well, I think that is enough of the before/during photos, let's get to the fun stuff!
Taaa Daaaa!
I LOVE THIS ROOM!


The Chinese Characters say: Hope Family Dream Miracle Inspire Peace
Nina's closet is oh so tiny. The little drape in the center is another 'closet'. The China doll that I didn't really get a good shot of, our Mandarin teacher gave us. He and his wife were so kind. I consider it a great honor that they were a part of all of this.
I tell my kids they cannot put stickers on the wall, and what I do, put stickers on the wall. Yet it is a perfect whimsical touch. I got these at IKEA when we were in Chicago. But, accidently left them there. Fortunately this must be a common practice because I called the store and they have a 'left behind' list. My stickers made the list, so on the way home to KC we stopped by IKEA and grabbed them. And I am OH SO GLAD I DID! Fun! Fun! Fun! And I love the ladder there, as if she is climbing a tree to bed.
Can you tell how much I love this fabric? It is the perfect tie in to all the colors, including the Red Thread print on her wall. I just went a little nuts using it I guess. But, I was thrilled when I found it.

The Red Thread print was actually the very first thing I bought for Nina-Li's room. The poem, which I will put at the end, is so fitting. I tried to find fabrics that went with the print and couldn't. I just prayed that somehow I would be able to tie it all in together, and with my favorite fabric, I think it works.
Thank you for humoring me in this post. I will finish with the poem:
Red Thread by Mark Searles
When a child is born, invisible red threads extend from the child's spirit and connect to all significant people who will be part of the child's life. A the child grows, the threads shorten, drawing closer those people who are destined to be together.

Monday, September 13, 2010

A Room With a View

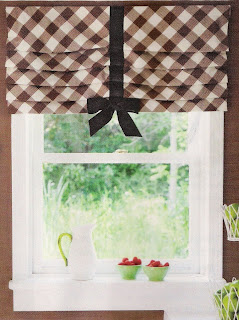
Nina-Li's room has a view - of our street. Little privacy. So, when I was deciding what to do with her window treatments there were two objectives. One, to let the sunshine through. Two, to be able to close for privacy. So, I doubled up. I was inspired by the Spring 2010 BHG Do It Yourself Issue. There was an article in which someone used the CHUNKY PLAIDS to decorate with! Loved it. I was on a mission. Check it out:


I couldn't find the green, but found a shade of pink that I thought would do. The hunt for this plaid was crazy. I went to every store I could think of in our area that might have it. Searched on the internet for hours. FINALLY, I was chatting on Facebook one night and saw a little ad on the sidebar for fabrics. Went to it, and there it was!

First, I made simple curtains that I am using clip rings for to pull open and closed. Then, I used this picture to add a touch of daintiness that I just love!


I had every intention on making the white shades. Then, one day I was in Target and found two tie-up window shades marked down 75% to $3.74 each. I just had to narrow them and I took off the ties they had to make my own. I then added a dowel in order to create the same look that I find in the magazine. This made my work a lot simpler and more affordable.


I am very pleased with the end result! I love these window treatments. I hope Nina-Li enjoys them as well!

Saturday, September 11, 2010

Sitting Pretty

Well, I dragged another item home from Goodwill. Bill was a bit perplexed what in the world I was going to do with it. I guess I can understand that. Believe it or not I had a few different ideas of the possibilities. So, we began with this:

The back of it was stamped bunkbed. So it was a headboard of a bunkbed. I asked my sweety pie to cut the sides down so that the 'legs' were gone. And I toted it around the house. First I had it in my kitchen and thought it could be a mini wall hutch. I then took it upstairs and thought we could make it into a small table top coming out from the wall. Then, I took it to Nina-Li's room. I thought she might be able to use it as a wall shelf. However, on the wall it would fit on, it would be positioned too high for her to reach. Then, I remembered Bill saying he wanted Nina-Li to have a window seat, AHAA! I asked him what he thought and he said to go for it.
So, first I had to take apart the backing and some wooden type brackets that were on top. I then had to make it a deeper bench. It was only about 6 inches deep. I added a 1 x 8 that we had on hand. However, I used a 1 x 6 for the sides to widen the legs.


I then had to add blocks underneath the widened seat board to attach the beadboard backing I had. Although the bench itself is deeper, I didn't deepen the shelf. It's still the original 6" depth. Once the nail boards were set, I was able to insert the beadboard and attach it. I also added a center support piece to the back part of the bench as shown in the photo.

Once everything was built. (Which by the way, I got to use a few power tools: a circular saw, a miter saw and an air nailer.) I painted our bench black. I know, not very girly, but there is a lot of white in the built-in furniture Bill is building and it ties in everything...you'll see...eventually.


I had foam from little chairs the boys had when they were toddlers. I put it on top of the bench and covered it with this incredible fabric. I LOVE THE FABRIC. I also made little cushion and pillow for the rocking chair in her room out of it. I need to go get more because I have one more idea. Anyway, check out the end results: